Monday, May 10, 2010

The Mermaid Is In Her Grotto

I had a lovely Mother's Day weekend, getting to do just what I wanted, so now I have my finished needlework to show you.

Here is the mermaid, with garnets in her hair and a rather fancy mirror.

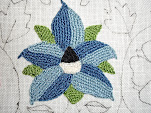
Here she is in her grotto, but not quite done.

And here she is in the grotto with fish, shells and semi-precious stone chips. I am especially please with the freshwater pearl in the shell - that is a real shell from a family vacation that actually stayed joined.
I am very happy with how it has all turned out. And it was so much fun. For the final bits I was able to consult my own copy (as opposed to the university library copy which I have returned) of "English Embroidery in the Metropolitan Museum, 1580-1700:'Twixt Art and Nature". My DH got it for me for Mother's Day and found it online at list price still in the shrink wrap!! If, like me, you missed getting this book and now can only find it for over $100, you will appreciate the find. I was able to look through the pieces in the book that had water to decide what I wanted to do with the purl since the instructions gave a couple of suggestions for variations.
Now I have all the amazing leftover threads to hoard. I've always had a problem using my best threads for small or experimental things, and these threads need something really wonderful. So I have some thinking to do. In the meantime, I have a coif to work on and the president's challenge for my EGA chapter to start (and finish by our June meeting!).

Tuesday, May 04, 2010

A Little Bit of Tail

I'm alternating my time between the coif and the mermaid, doing a 2 week each rotation so there is some consistency in my work. I've already let the family know that I want to stitch the whole of Mother's Day weekend except for a trip to the art museum to see the new wing and have lunch in the new restaurant there. If you want to see the latest on the coif, hop on over to the Gentle Pursuits blog.

That was before the meeting, this mermaid work is from the past weekend. I finished the fins for the end of the tail a while back. There is a gilt strip worked into the buttonhole lace that is really nice. The skirt is done with a new thread - a silver silk twist similar to the gilt silk twist from the Plimoth jacket project. The silver is a little harder to work with than the gold. I think the twist is a bit tighter so it doesn't flex the same way. According to Tricia's remarks in class, this was just a trial run and it should be fine once they get it to the point where they are producing enough quantities to sell. The kit included some peacock feathers to put around the edge of the skirt, but Tricia encouraged us to be creative with our mermaids, so I did something different. I'm fond of pearls so I used some tiny white beads to edge the skirt to keep things in scale. I have some small, cultured fresh-water pearls and some mother-of-pearl beads as well, but they were too big for the edging - I'm thinking of putting one or the other in the mermaid's hair.
Next I went to the fish since the head and tail were on the same needlelace pad as the mermaid's tail pieces. The head and tail were stitched onto some felt and then I carefully sewed down the spangles to form scales. The sample had a mix of gold and silver covering the body but having studies zoology, I felt the need to be a bit more realistic. So I carefully covered the body in rows of gold, and then used the silver for some fins. The fish is just over 1 inch long.

Friday, March 26, 2010

Grotto rocks done - on to the mermaid

Things have been fairly quiet in the evenings lately, so I've been able to finish all the rocks in the mermaids grotto. Most are similar to the ones already done, bouche threads, silk gimp, French knots and purl purl variations. The one new rock is the front rock on the right side made up of lots of loops. The loops are small bits of silk wrapped purl - the silk wrapped wire that is then coiled. Tricia suggested it in class, and since I am in love with the purl, I just had to do it. I put one layer of felt under the loops just to bring it a bit forward, and it also helped because it gave something for the wire to hook into to keep the loops in place.

Here is a close up so you can see the loops of purl.
I still need to finish the bits of coral in satin stitch in the background, but in the meantime, I'm working on the mermaid. I have been questioning the body of the tail that I did in detached buttonhole lace using GST. As I did it, I didn't make the stitches very close or dense thinking it looked more like scales. But as I looked at it further, I realized that part of the reason it looked okay was because it was on the blue plastic that was the base for the needlelace pad. So, today I decided to remove the piece and see if I needed to do it again.
Here it is placed over the wool padding, and I really don't like it with the white background.
But then I remembered Tricia mentioning in class that she wished she had used the flat gold thread that she put in the end of the tail into the whole tail, so I found some gold ribbon that I could cut to put behind the buttonhole lace, and now I am happy with the look. Now it looks more like gold and green scales. I was also worried that the piece was too small, but it turns out the size is fine. So on to the tail fins!

Monday, March 22, 2010

Busy, busy, busy

I know it is hard to tell, but I have added two more stitched rocks to my grotto! During class, we did rocks all over the place depending on technique so we could try each one. As I'm finishing them off, I'm trying to start with the back and work forward so there is a natural sort of overlap. I did the blue and green bouche thread rock second from the left at the back. I had to make a couple of more mixes for that one, which helped to reinforce the twisting technique. Then I did the yellow/orange silk gimp rock in front of it. I actually did two layers because the one layer - like the blue and orange silk gimp rock at the back left - is very flat. I was please with the texture, although in hindsight, a layer of felt would have used less gimp - so I would have more for other things. The gimp was made by Tricia, specially for the kit, and it is really spectacular. But them I'm a sucker for silk of any sort.

Now to the coif. I'm still doing tests as some new colours of Soie Perlee have arrived, since there were a couple of places where I wasn't getting quite what I wanted. This daffodil is a case in point. I didn't like the gold and yellow contrast and the green was to bright when compared with my photos of the demi-lune purse at Agecroft that I took the daffodil from. So, I did some stitching tests to see what really when together because it was really hard to tell with the spools. Turns out it was a great idea, because two of the yellows look totally different than what I expected. When I have time (yes you can laugh here) I want to make up a whole sampler of the colours of Soie Perlee stitched up since that is really the only way to see how things will truly look. So, I'll show the final dafodill when it is done on the coif, you can see the start in the last photo. Here is the tudor rose - on the coif!!! Yes, I've finally started the stitching on the coif. Nobody wanted to take it home at last week's meeting - several people want to eventually, but they want to practice a bit more. I'm not completely happy with this because of the straight lines, so I'm going to play with things a bit so see how to fix it and add that to the instructions. It may be I need to work the petals from the inside out to the edges, rather than the tips in method I used. I just find it easier to get the outer edge looking nice if I start there, but the inside to the outer edge is actually the method used on some of the petals on the demi-lune purse - I had help when I looked over the photos.


So here is how it looks as of March 22, 2010. Stay tuned.


Wednesday, March 10, 2010

More coif practice

I've never had such a hard time trying to decide what to do. Mermaid grotto or coif motifs? For now, the coif is winning since I have to hand it on to the next person at our meeting next week.
Here is the mounted linen with the pattern drawn on it.


I've done some more tests before actually working on the real thing. This one was to figure out which direction was best for the detatched buttonhole. I know that when you look at historical photos there is a preferred direction to some motifs, but for the coif we are being relaxed and letting people stitch in whatever direction works best for them, as long as the whole motif is the same. When it is being worn and people see it moving, they probably won't be able to tell which direction the stitching is going.
This is a motif from the demi-lune purse at Agecroft Hall. We have no idea what flower it is (any suggestions?) The yellow cup will not be the shades you see. The petals will be like those on the right. I'm not sure which bud colouring is best. Maybe we will use both.


Sorry this is in sideways but I'm too lazy to do it again. This is the borage, unfinished so far, that I was using for a colour test. You can see the lighter colours to the left in small squares. Comments indicate that people like the dark blue best, so we'll go with it. Now I need to decide the best way to do the center.


Here is the honeysuckle.


And here is the pansy. The colours are quite striking and I like the gold leaf veins.


So now I need to make up a book to give everyone guidance on each flower and the colourways. We'll do the goldwork last.


Friday, February 26, 2010

Mermaid day 3 - final day of class

So today we stopped with the rocks and started on the mermaid and fish. Much of the day was spent going over historical stumpwork slides to see the faces and grottos and fish, and even a frog that everyone loved. Tricia even had an x-ray of one mermaid so we could see the padding underneath. There was lots of discussion about how well endowed the mermaid should be.

We made muslin pads for needlelace. One great technique, that I didn't know about, was to put contact paper over the muslin with the needlelace outline. Then you don't have to worry about catching the fabric as you stitch. This is the lower body of the mermaid, the tail outline is to the left, the skirt to the right. I will also be doing a fish head and tail in needlelace - the body will be sequins stitched onto the felt form.

Then we started on the mermaid form. We will stitch the mermaid on the muslin and then cut her out to place her on the grotto. Here is the mermaid with padding for her tail and arms and such.


Next was her face in the mirror she is holding. Another piece of mica will go over this. I've stitched the comb in her other hand but haven't taken the photo yet. Tricia had a wonderful photo of a period comb, a huge double sided thing made of boxwood with intricate carving.
We then went over the technique to stretch the Purl Purl to couch over the mica to form the water once our mermaid is mounted in her grotto. And then we discussed various embellishments that were used. Some of the grottos are filled with tiny pearl and tiny coral beads. Others have huge stones that don't fit in, but I'm sure it was a sign of status to have fancy stones sewn onto your stumpwork. I'm going to wait until I have my rocks done before I decide what to do. Go natural with real shells and tiny pearl-like beads? Or go over the top with lots of semi-precious colourful rocks? We'll see.
So as you can tell, there is still alot to do, but I'll post as I get more done. Probably not for a couple of weeks though, since I have the mounted coif for Agecroft Hall and I need to get some flower motif instructions done so it is ready to be passed on to the next person at our March meeting.

Thursday, February 25, 2010

Mermaid day 2

(Note: This is posted a day late because I was busy watching the Canadian women's hockey team win the Gold medal in the Olympics)

Today we played with dangerous equipment - awls and needle felting needles. Here is where I started the day. After posting my first day's progress, I worked on the techniques from the day and finished a rock in each technique. Except the drizzle stitch rock - I wanted to have it checked to make sure I was doing the right sort of thing.

We learned several new thread making techniques based on stumpwork pieces that Tricia has been able to study.
One fun technique uses Purl Purl. We threaded some Soie Ovale through the coil, then stretched the coil, then twisted two of these threaded coils together. Tricia showed us wonderful slides of stumpwork using this twisted technique.This is the threaded Purl Purl. The kinks are where the needle came out and went back in.
Here are the stretched coils being twisted together.
Here are the two colours for a couple of the rocks. The 'threads' are couched concentrically around the rock outline, moving to the center.

Then we had to create our own Purl Purl with Gilt Sylke Twist - actually, this was some silver twist that we were lucky enough to work with!! We twisted the GST around a fine wire, then twisted that around a needle. It is really fun. This time we used it in the coiled form and couched it down. You can see this give a really rocky granite like look.

We also made Bouche using Soie Ovale. We clamped a block of wood with a hole to hold an awl to our tables. This acted as a holder for the thread we twisted using techniques similar to those used to make threads for Japanese embroidery.

First we twisted 6 strands of Soie Ovale for the core, then in a second colour of Soie Ovale we twisted one strand in the opposite direction, then a second strand twisted in the same direction as the core, making a nice kinky thread to further the rocky texture. The top spools are rock colours I've made, the bottom is for mermaid hair, with only a single outer twist.

After all the thread making, we ended the day by needle felting a fish form. I didn't need any band aids.
So here is the left side of the grotto with the new threads. Along the left side, the top is the silk gimp couched down that was done the first day. Then the stretched Purl Purl, then the red and pink purl purl I made, then the blue and orange bouche couched down on the padded rock to bring it forward a bit. And you might notice that I finished the drizzle stitch rock in the center, using two more shades of the Soie de Paris. I found that if I twisted even more than I thought I should it looked even better, although it is rather knotted on the back.

Thanks for the comments, I hope you find my notes helpful. I didn't take notes in class so these notes are for my reference as well. I highly recommend Tricia as a teacher - not only do you learn the techniques, but you learn the history and you find out how the threads are made. Very interesting.

Wednesday, February 24, 2010

The Mermaid in Her Grotto class

I am in Williamsburg taking a 3 day stumpwork class - a perfect Christmas gift from my wonderful husband. The class is part of a long running seminar, A Gathering of Embroiderers. I've heard fellow EGA members discuss the class but never remembered to look it up. This year it was mentioned on the Thistle Threads blog, and this particular stumpwork project was shown, so I just had to take the class.
It has been a wonderful experience, at least on my first day. The hotel is wonderful, all the people are great, and Jeannine Koons, the organizer, and her husband and son who help her are the nicest people and really make the event a pleasure.
Tricia Wilson Nugyen is the instructor and the historical background and detective work is as interesting and fun as the actual stitching and using the new/old threads she has brought for this kit. We all had so much fun unpacking supplies this morning. I could have spent all day just looking through all the threads and supplies. But it got better because I was able to stitch.
This photo doesn't look like much, but it was fun. This is the rocky grotto that will hold a mermaid and fish. In the bottom center is a sheet of mica - yes the rock! It will give shimmer to the water. We had to learn to split the layers to get it thin enough to stitch through. The lower left rock is just padding so far. Moving clockwise, there is a small rock of drizzle stitch in Soie de Paris, then a Soie Perlee French knot rock, then a French knot rock using some hand made, by Tricia, silk gimp. And finally some padded satin coral.
On top of the threads and stitching, there is a boutique with amazing supplies for sale. So I bought a few things to enhance the grotto. I'll point some of them out when the appear.
Now I really must get stitching to fill in some of the rocks. Some industrious class members have one or two rocks done.

Wednesday, February 03, 2010

Our New Family Member

No stitching photos today, although I have been testing colourways and silk amounts for the coif motifs. I haven't had time to photograph and upload them all because of this:We all fell in love with this puppy when we saw her in the SPCA mobile adoption van that was visiting the greenhouse - we were getting gecko plants.
Abby is already quite spoiled - after 2 1/2 weeks - and loves to sleep on the couch or a lap.
She is great at fetch and often tries to get two balls at a time, one in her mouth and one that she bats around with her front paws, like a cat.
Of course, house training a puppy in the snowstorm that just went through has been a challenge!

Saturday, January 16, 2010

Testing, testing...

Here are the thread tests I've been doing for the coif. More info on the Gentle Pursuits blog

My previous post had the silk and cotton floss test, which was okay, but here are the cotton perle tests.
This is size 5 - too large and clumsy.
This is cotton perle 8, which is okay but it was hard to do the points on this cornflower. However, the faux gold from Thistle Threads is great.
The petals and strawberry are Soie Perlee - really lovely. I love the gold on the strawberry - you will see that combo on the coif for sure. The rose center is spiral trellis in the silk. While I found the regular trellis too hard to use as a fill, the spiral trellis seems easier and looks nice as a center. There a several different motifs with round centers or bases so it may be that the flower centers are French knots or some other round stitch - we'll see.I didn't have any green Soie Perlee - at the time - so I used some of Catherine Jordan's overdyed cotton floss for the leaf. I actually like the effect and I can see using it for a project where you want a slightly mottled old look - it works up nicely.

I now have a lovely selection of Soie Perlee from Hedgehog Handworks. I talked with a very helpful woman on the phone who helped with getting shadings right since I couldn't find a good online colour chart. I will test the amounts now and order the threads for the project soon - since Hedgehog Handworks is having a sale until the end of the month! Isn't all this colour enough to make you want to get off the computer and stitch! So that is where I'm going...

Wednesday, December 02, 2009

New Projects!!!

I'm very excited to be part of a new outreach project with my EGA chapter - Gentle Pursuits of Richmond. We will be making two Elizabethan style coifs for the interpreters at Agecroft Hall. You can read all about it on the blog I write for the group . We hope to post regular updates as we work on this project. Let us know what you think!

Here is my practice motif. I think I'll need to try another!

My other exciting news is that I will be taking the class The Mermaid in her Grotto in February. I had originally been planning to take Tricia Wilson Nguyen's Goldwork Masterclass through her Online University, but then I saw the mermaid!

Friday, September 11, 2009

Reading to Save the Planet

One of the collections librarians at my public library must be interested in "green" books because I always find something new and interesting on the shelves. This summer, I've read three of the many books I've seen there, and I can heartily recommend them. Of course I've been frustrated, embarrassed, angry, and hopeful by turns as I've been reading these books. Despite thinking that I'm living carefully, I've realized how little I do to help and how much I do that can hurt, but I think I've got some ideas about what more I can do help people and the planet.

Early Spring: An Ecologist and Her Children Wake to a Warming World. by Amy Seidl, is an excellent book on global warming and climate change. Rather than quoting lots of climatological data, she makes things real by looking at how timing has changed for seasonal events. The change of dates for bird migrations and maple syrup gathering. The insects that appear early and late, out of sync with their bird predators. The lack of solid ice on many norther lakes and snow at northerly latitudes affecting ice fishing contests and winter fairs. It may be hard for some people to grasp the rise in temperature and sea level expected in 100 years, but most people can recognize a change in the seasons from childhood to adulthood. With lovely, sensitive writing about her family, home, garden and the woods around her in Vermont, Amy Seidl quietly brings people around to the problems of global warming and why we need to be concerned.

Along with global warming, I am concerned with all the chemicals people apply to their lawns, especially since we live next to the reservoir that supplies our drinking water. So I eagerly read 'A Weed by Any Other Name; The Virtues of a Messy Lawn, or Learning to Love the Plants We Don't Plant' by Nancy Gift. Despite starting out in a weed science program where she studied weed control in crops (i.e. pesticide use), Nancy Gift is now the acting director of the Rachel Carson Institute at Chatham University in Pittsburgh, PA. Nancy Gift lives in the suburbs so she understands the desire, and sometimes the need, to conform to the standard weed-free perfect lawns. But she is also a mother who worries about the effects of pesticides on her children and she loves many weeds and feels a green lawn can include them, along with grass.

I was especially interested in this book since our front lawn has been taken over by moss and a wonderful weed that is a perfect ground cover - it stops growing at about 3 inches, takes the shade, grows on the clay, and looks fine (I suspect this is mainly because the yard slopes down from the road and the strip along the road has some grass). I'm sure if my children were playing on it, it wouldn't work, and the backyard is not so great, but for the front it seems fine, and my DH has only mowed once the whole summer. So I'm all in favour of weeds.

I also have a fondness for small mammals - I did my honours thesis research on voles - so I like to see animal holes in the ground around our yard. And I'm happy our yard it filled with toads.

Anyway, Gift's book covers various weeds seasonally as she discusses ways to live without pesticides. She gives lots of ideas for ground cover and how to justify a weedy lawn to the community association and especially how children can learn so much from playing in a yard with a variety of plants. If you want to escape from the tyranny of feeding, watering and pesticide application, this book will help.

The final book I've had a chance to read is 'Confessions of an Eco-Sinner: Tracking Down the Sources of My Stuff' by Fred Pearce. Pearce has travelled the world to find out what really happens when food is grown and raw materials are harvested, and how things are really disposed of. It is frustrating that the fair trade coffee I buy to try and help is not quite a good as I hoped, although it is much better than regular coffee. And while some cheap cotton t-shirts are made by companies slaves and children, other companies provide women independence from their husbands and money to educate their children, despite the sweat shop conditions. It is all terribly confusing, but it also made me realize that we all need to be more concerned about where the things we buy come from. And as long as Westerners want cheap goods, Third World people will be exploited. Pearce also tells some more inspiring stories about people who are doing good things. WonderWelders (www.wonderwelders.org ) uses money from selling refurbished phones to support a workshop of polio survivors making beautiful sculptures from scrap in Dar es Salaam. Projects to green cities, especially with edible plants, are growing. So Pearce leaves us hopeful - although we all have to work at it.

I have more reading ahead. Jane Goodall's 'Hope for Animals and Their World: How Endangered Species are Being Rescued from the Brink' and 'Half the Sky: Turning Oppression into Opportunity for Women Worldwide' by Nicholas D. Kristof and Sheryl WuDunn. Both look wonderful.

Wednesday, September 02, 2009

A Happy Mistake

A few posts back I showed the horse DD the elder drew for me to stitch for the top of another satin box. I used a nice chestnut silk I had in a few shades to give some dimension. I used the lightest to make the mane and tail using Turkey work, but then I had to stiffen the threads in some way to get them to go the way I wanted. Instead of looking in a book or checking the Internet for suggestions, I decided to make my own mistakes. I used hair products, reasoning that silk was protein like hair. So I sprayed a curl enhancer on, since it stiffens my hair. But, it was very wet and of course the colours in the silk bled all over the fabric. BUT, that was okay. It toned down the colour, which I wasn't completely happy with, and now the white fabric doesn't show at the edges after I cut the horse out. The curl enhancer didn't really hold the threads either, so I used hair spray in the end! So here is the satin box finished - only 4 more to make!

If it is the beginning of the month, there must be more geckos. Here is 6 - only one egg in this clutch. I've taken the photo with my new macro lens, but it is hard to work with a squirming animal.
This is the father Norbert. He has grown quite large - probably over 8 inches now.

Saturday, August 15, 2009

Stumpwork Tudor Rose box done

Once the rose and leaves were done, it was time for a butterfly - all the Elizabethan things seem to have a bug of some sort. I decided on a blue butterfly to be done in detached buttonhole lace. First I laid the wire, then I started the fill. I tried first with some filmy sort of thread from a kit I cannibalized, but it was horrible to work with as detached buttonhole, so I switched to silk. The bigger wings I did from the tip in, and the lower from the body out. I made sure there was enough separation between wings when I set out the wire so it would be easy to stitch, but later realized it might be a problem when I wanted to push them a bit closer. It actually turned out fine - though I'm sure there is a better way.
Here are the finished bits, ready to go on the box.
And here is my finished box. I'm rather pleased. Actually, it isn't really finished since I need to cover the wires with some material on the underside of the lid, but that will be easy (knock on wood - famous last words).

Thursday, August 06, 2009

Stumpwork sepals close up

I think I chose the wrong photo yesterday, so here is an in focus photo of the bullion picot edge on the sepals, and the long buttonhole I'm using to fill in the inner part of the sepals. You can see the material showing through in the center - I've since poked through it to put the flower together. Paula is mainly right, bullion picot and buttonhole, but the ends are buttonhole as well, since I wrap wire very poorly. Since I can't find bullion picot instructions online, I'll have to direct you to sharon b's bullion stitch instructions, but make it a very short distance between the in and out points on the stitch, and add lots of wraps. Mary Corbet has a video that might help as well. I've looked through my books and can't find the one where I learned how to do it, of course. Hope this helps.

Tuesday, August 04, 2009

Stumpwork Tudor Rose instructions - part 2

A quick hint on tools for wire bending. I started out with the red handled size - a cheap kit for beading from the craft store - and then moved up to real tools from Home Depot. They aren't great tools, they came in a box with lots of hand tools and most were bigger, but the whole set was only $12 (around Christmas) so it seemed like a good deal to me. The larger pliers are much easier to use, so treat yourself to decent tools.So yesterday, I had a lovely stretch of time after work and completed my Tudor Rose. For the sepals, I used green paper wrapped florists wire. In this case, because of the sharp tips, I bent the wire first.
Then I tacked down the wire and started doing a long button hole over the wire to form the sepals.
I had to stop in the middle of it all because two more baby geckos were born. We are up to 9 babies, 2 adults (in separate habitats) and one egg, due to hatch in a month. The female seems to be gravid again - we found out they can store sperm for a year so who knows how many more eggs will appear.
Back to the stitching. I used bullion picot along the tips of the sepals to simulate the jagged edge of the sepals.
The cutting out was easy and it was no trouble getting close. I am very happy with the neat edges formed by my non-woven material, whatever it actually is called. I'll have to carry a sample with me so I can check whenever I go to a fabric store. (or I'll have to change the brand of sanitary napkins we use in the house) While you do have to be careful not to create huge holes in the material, it did form the nice edge I expected.
And here is the completed rose on the box top. Not the final placement, just a test, since I plan on adding more decoration and the rose would get in the way. I just poked a hole through the material, padding and cardboard base, for those who wonder how it got there. I'll glue a piece of felt to the underside of the lid to hide the wires when it is done. DD the younger pointed out that it was off center, but I actually meant it to be, part of the design I have planned, so stay tuned.