Tuesday, March 01, 2011
Send a heart
Hearts for Christchurch is organizing the donation of stitched hearts from around the world to show concern for the people of Christchurch.
Saturday, February 26, 2011
Lion Roundel final steps to FINISH
So last week I was so busy stitching in the evening, so all my stitching is in one big blog post.
Here is the sun, made with gilt strip and crinkle gilt strip with an outline of gilt 1 1/2 twist, all couched down with TIRE silk.
Here is the sun, made with gilt strip and crinkle gilt strip with an outline of gilt 1 1/2 twist, all couched down with TIRE silk.
 The grass is Soie Ovale stitched over a large paperclip. In the historical pieces and the sample from Tricia, they cut the loops to form a fuzzy surface - much easier than Turkey work but very susceptible to pulling. One of Tricia's hints was to wait until all the stitching was done before cutting. But when I had it all done, I was rather fond of the looped look. I'm also not sure of my ability to cut the loops evenly. So I'm leaving my grass as loops. Maybe I'll try the cutting on a smaller area some day.
So, here are the sun and clouds and grass all done.
Next up, the mane and tail. Tricia used a combination of purl left as is and pulled, and twisted silk gimp. As I've mentioned, I love the silk gimp, but the purl curls made me think of the Cowardly Lion after his makeover in the Emerald City, so I started thinking of something different. I looked through all my books to see how the various manes looked and then I though of a technique used for the mermaid. We threaded Soie Ovale through purl, then pulled the purl, then twisted to purls together to mix the colours. You can see this in the rock below. So I twisted various colours of brown purls threaded with various colours of brown silk and then couched it down with light brown Soie Ovale. I am very pleased with how it looks. I added ears done in detatched buttonhole on wire so I could shape them. DD the younger says they look like rabbit ears, but I think she is trying to push my buttons.
 The face came next and then the covered parchment around the lion. I spent time watching football and hockey twisting 3 shades of Soie Ovale and one shade of purl around 1/8 in by 5 in strips of parchment. You can see the face and roundel below.
The final step was adding spangles at the corners. I think it is very interesting how a few little spangles can really finish a project. The top photo below is a plain corner, the bottom has spangles. I makes a difference.

Framing is a bit of an issue. I didn't use glass on the mermaid, but with the parchment and purl mane, I really felt this one needed glass. I found a memory box type of frame, with a front that opens, but the 5x7 frame was deep and dark inside so it didn't seem like the best thing. So I picked up an 8x10. I'm not sure about the amount of space around the embroidery, so this may change. There is some glare, but you get the idea. Here is the close up, no glass in the way. I'm pleased with my final product, even if the lion is neither scary or fierce looking.
Saturday, February 19, 2011
Florettes and Cloud 1 for Lion
I've been having some very productive evenings this week. I've been watching episodes of Last Chance to See, on DVD, with Stephen Fry following in Douglas Adams footsteps to view endangered species. And stitching at the same time. I have thoroughly enjoyed myself. I did the florettes in the 4 corners of the piece using purl cut in small pieces and looped into petals. It is fun and looks really neat.
 Then I went on to couch down blue gimp and blue and cream gylt silk twist to form clouds. The threads are couched down with Tire silk, which is a nice shiny gold silk.
 So this is how it looks so far.
Tuesday, February 15, 2011
Lion progress
I have not been able to do much stitching because of a stye in one eye that has finally cleared up. There is nothing more frustrating that being home from work but not feeling well enough to stitch. My lion is slowly progressing though. I've been working with a new stand lately - an F.A. Edmunds Adjustable Craft Floor Stand. I purchased the stand at a Hobby Lobby opening sale because I needed some help managing the coif frame. Well, it is okay for the coif frame, it does help hold it steady, but for something that big, you really need the two legs slate frames normally have. On the other hand, the small scroll frame I have the Lion Roundel in fits the stand very well and really helps. There are mixed reviews for the stand on Amazon, but for the right project, it is very good.
 So here is the lion's body with all the silk gimp couched down. I must say again, I love working with silk and I love the silk gimp. It is worth getting some and trying it out.
 Here I've done detatched buttonhole for the lion's face. Tricia used the Soie Ovale to do a satin stitch face, but one of her personalizing suggestions was detatched buttonhole. I've been doing lots lately because of the coif so I thought I'd make less of a mess this way - since I tend to snag Soie Ovale constantly and I just happened to have the right colour of Soie Perlee. The corner florettes are couched gilt 1 1/2 twist - I've sunk the gilt but haven't pulled back the tire silk ends to catch the gilt ends.

I wanted to mention a couple of my Valentine's gifts because they are very special. First DD the younger made me two watches with beaded straps. I think I may be getting her to make more so I have lots of wardrobe options.

The other gift is chocolate and coffee from Full Circle Exchange which is a group that supports CARE and other groups. I received the Name Your Love CARE chocolate that allows you to put your own message on a box of really good chocolate, plus the coffee and chocolate send money to CARE as part of the Wake Up To Justice project. I hadn't realized it, but CARE is focusing on girls and women because they have found that the best way to help a village is to take care of the girls and women, isn't that wonderful.
 So here is the lion's body with all the silk gimp couched down. I must say again, I love working with silk and I love the silk gimp. It is worth getting some and trying it out.
 Here I've done detatched buttonhole for the lion's face. Tricia used the Soie Ovale to do a satin stitch face, but one of her personalizing suggestions was detatched buttonhole. I've been doing lots lately because of the coif so I thought I'd make less of a mess this way - since I tend to snag Soie Ovale constantly and I just happened to have the right colour of Soie Perlee. The corner florettes are couched gilt 1 1/2 twist - I've sunk the gilt but haven't pulled back the tire silk ends to catch the gilt ends.
I wanted to mention a couple of my Valentine's gifts because they are very special. First DD the younger made me two watches with beaded straps. I think I may be getting her to make more so I have lots of wardrobe options.

The other gift is chocolate and coffee from Full Circle Exchange which is a group that supports CARE and other groups. I received the Name Your Love CARE chocolate that allows you to put your own message on a box of really good chocolate, plus the coffee and chocolate send money to CARE as part of the Wake Up To Justice project. I hadn't realized it, but CARE is focusing on girls and women because they have found that the best way to help a village is to take care of the girls and women, isn't that wonderful.
Wednesday, February 09, 2011
New Family Toy
 While in Williamsburg last week, there was talk of tools as well as fiber. One woman had a pair of magnifying glasses with lights at the temples that everyone was interested in. The other day while I was in the drug store, lo and behold, there they were. Foster Grants at that. I was laughed at by DD the younger when I wore them the other night, but last night the power went out and suddenly she wanted my glasses, as did her sister. And when DH saw them, well of course, there are several steps in violin making where he could use them. I may be going back to get a couple of more pairs.
The nice thing is, the light is at the white end of the spectrum so the colours look very good. The top photo is the light from the camera and the lower photo is just the light from the glasses. I'm very happy with my new tool.


BTW that is a Betsy Morgan needle roll sewing kit I did a few years ago.
Friday, February 04, 2011
Metal Stitches for the Glittering Floral Lattice
 The silks I picked up yesterday. No plans, just like the colours.
Except for some basic instruction from my mother early on, I have spent most of my life learning stitches and techniques from a book and a couple of Erica Wilson videos. So it should be no surprise that my stumpwork class in 2006 was a revelation and my technique improved dramatically. And going to work on the Plimoth Jacket did wonders for my detatched buttonhole stitch. All the classes I've taken with my EGA chapter have helped as well, and now I have a new respect respect for blackwork and metal stitching.
The blackwork class was a chapter program tied to Agecroft Hall - we are now working on a couple of blackwork edged handkerchiefs. You can see the class photos here. I had tried following instructions in the past, and some of it looks like it should be easy, but I never could get it right. Jean made things very easy so now I'm ready to work on a handkerchief.
Today's Glittering Floral Lattice class was the same. I've tried a couple of the stitches from diagrams in a stitch encyclopedia, and it was never quite right. But today, with lots of explanations and hints and Tricia's great diagrams, I think I got most of them. The big part of this kit is the two very large spools of real silver and gold thread. I've been practicing with faux silver, but I did try some of the gold and it is wonderful. The two boxes of Grecian twist and the yard of gold lace ribbon are extra purchases that will frame my work when I'm finally done.

So here are my stitch trials. I used a .o5 micron marker to label the stitches because I'm not likely to remember the look without a label. As the day went on my stitching got better. Just like everything else - practice, practice, practice.


Here is Tricia's almost finished sample for the class. I've just realized the photo is upside down but being a basically lazy person, I can't be bothered to rotate it since I don't think Blogger will let me do it in the post. I'm sure you can see it is lovely.

Tricia gave us lots of hints for combining gold and silver or different sizes of gold or adding coloured silks. She also suggested doing the motifs (which aren't that large) as scissor fobs or other smalls. I'm thinking of a small box with a motif on each side. I've been contemplating making a box for a while now and testing different techniques would be perfect. Don't hold your breath though. What with the coif and a second one to start and handkerchiefs and life in general, I'm not sure when I'll get there.
Thursday, February 03, 2011
Stumpwork Lion Roundel Class
It was great to see so many familiar faces in class today as we listened to Tricia explain the new threads and stitches we needed for the stumpwork lion and the surrounding roundel. As always, the kit is like Christmas all over again, and the slides of pieces in various collections are inspiring.
 I was reading Spinster Stitcher today and she mentioned a designer, Orna Willis, who encourages students to change and rethink her designs. Well, Tricia encourages us to try new things as we create her designs as well. We looked at at least a dozen lion heads in embroidery today and each time she said we could try it that way. The mane and face are going to be fun.
Haus Tirol: the Stitching Well: 1915 Pocahontas Trail Suite E6, Williamsburg, VA 23185. The winter hours are 10AM to 4:30PM Monday through Saturday, during the summer they may stay open a little later. The phone number is 757-220-0313 and the e-mail address is haustirolstitchingwell@verizon.net
It was also fun to hear all the stories of the Jacket Trip. I would be extremely envious since I really wanted to go but it was a bad time of year and I don't think my DH wanted me going to England without him; but since I didn't go, I was able to go to Italy with DH when he was invited to speak at a meeting Sicily held at the same time, and it was an exceptionally wonderful trip, so I'm not that envious. As it was, Tricia had lots of slides from the pieces they saw on the trip. Be on the lookout for a possible kit from Thistle Threads to support the V&A Museum textile collection, just like the snail from the glove in the Bath Costume Museum.
So here is a view of the kit from today. The square cream coloured paper is actually parchment! Real parchment! It turns out the roundels on stumpwork or on framed pieces are strips of parchment wrapped with silk or silk purl ( have I said before how I love that the purl coils seem alive - they really are neat and I have 8 boxes of various colours!)
 As well as brown colours of purl, the other new thread is the silk gimp - the tan in the top of the photo below. It is a silk core wrapped tightly with silk and so it is heavy enough to be couched with rather than stitched. Tricia made some for the mermaid project last year, but this year it is actually in production and should be for sale soon. Get some if you can!!!
Here is Tricia's model for the class. As you can see, I have a long way to go since I've only put down some felt padding, done a tiny bit of outline, and started the grass (with a neat technique that involves a large paper clip). As well as brown colours of purl, the other new thread is the silk gimp - the tan in the top of the photo below. It is a silk core wrapped tightly with silk and so it is heavy enough to be couched with rather than stitched. Tricia made some for the mermaid project last year, but this year it is actually in production and should be for sale soon. Get some if you can!!!
 The gold is crinkle gilt strip that is used for the sun's rays and there is flat gilt strip for the sun itself. So much fun.
 I went to Haus Tirol - The Stitching Well (see info below since they don't seem to have a web site) at lunch to get stitching frame since I forgot mine and I need it for tomorrow's and just happened to look around at the threads they had and while I did get some silk threads (how could I not) none had the heft of the silk gimp. It is really excellent for a nice couched border or for couched fill, as you will see with the lion.
BTW: the ladies at Haus Tirol are wonderful and they have a great stock of patterns and threads and so many colours of fabric I nearly swooned. Be sure to check out the shop if you are near the area - especially if you visit to see the costume exhibit that I'll report on when I visit on Saturday.
 I was reading Spinster Stitcher today and she mentioned a designer, Orna Willis, who encourages students to change and rethink her designs. Well, Tricia encourages us to try new things as we create her designs as well. We looked at at least a dozen lion heads in embroidery today and each time she said we could try it that way. The mane and face are going to be fun.
Haus Tirol: the Stitching Well: 1915 Pocahontas Trail Suite E6, Williamsburg, VA 23185. The winter hours are 10AM to 4:30PM Monday through Saturday, during the summer they may stay open a little later. The phone number is 757-220-0313 and the e-mail address is haustirolstitchingwell@verizon.net
Wednesday, February 02, 2011
Getting Ready for Fun!
So, here I am, sitting in a lovely hotel room in Williamsburg, VA, getting ready to start stitching tomorrow. This trip is one of my big gifts from my DH at Christmas. (the other an amazing giclee of Jane Goodall in Gombe that is being framed). I don't know if all the participants will make it through the snow, but Tricia Wilson Nguyen, the instructor, came down from Boston by train yesterday to be sure we could have the class.
I'm very sorry for those of you trapped in the storm (having been through many while I lived in London, Ontario, Canada) but I'm very glad I live in Virginia now where it was 67 degrees while I walked the dog today.
Anyway, a coif update before I get wrapped up in the new projects I'll get over the next couple of days.
Some leaves for the coif. There are 3 shapes that will be two tone, the rest will be one colour. I'm not sure if we should actually assign colours for the solid leaves or let people choose, we'll have to see how things look. Maybe if there are 3 close colours it would work.


And this bud will be on either side of the mystery flower.
 So here it is so far. It is really quite wonderful how every flower or leaf changes the piece. Can't wait for the gold!
 P.S. I've been experimenting with my cameras to see what combination of zoom, etc. gives the best photo. Unfortunately, I've neglected to write down what I'm doing so I have no idea what is the best way to take the photos. I think that may need to be a priority soon.
Wednesday, January 26, 2011
Colonial Williamsburg costumes online
Just a quick note to let everyone know they can see some great photos of clothing from the Colonial Williamsburg collection online now.
What's even better, there is going to be an online exhibit of their reproduction clothing as well.
I am very pleased that I decided to add an extra day to my Williamsburg visit next week. I haven't had a good look at the Colonial Williamsburg textile collection in a while!
What's even better, there is going to be an online exhibit of their reproduction clothing as well.
I am very pleased that I decided to add an extra day to my Williamsburg visit next week. I haven't had a good look at the Colonial Williamsburg textile collection in a while!
Tuesday, January 11, 2011
Coif progress and travels
 This is the latest coif photo - as of January 10, 2011. I'm working on stitching the motifs that don't have instruction sheets yet. I've been alternating between writing about the coif here and on the Gentle Pursuits blog, but since I just posted there about our upcoming events, I thought I'd cover the coif here - just to keep you all on your toes.
So here is the borage. I started doing this flower in a very dark blue - scroll down on this post to see what we had decided on. A strange thing happened as I started stitching the dark blue on the coif. It looked awful! So I hunted around and found an Embroidery Motif wiki with just what I needed. It was created by a couple of bloggers I follow - quite a coincidence! It was a great help and I was able to find a really nice borage. However there are only 2 whole ones on the coif, so only one other person will have the fun of stitching a whole one.
 The Mystery flower also needed to be stitched. I've done this one several times, so it was easy.
 The pomegranate is not complete, but the rest of the filling and the bits at the top will be gold, so this is it so far.
 Finally, the carnation. This was another problem. When the silks came, the new dye lot of the pink was totally different than what I had practiced with, but I thought I'd just work with it, since there was no way of knowing if I could get the old dye lot. I was also unhappy with the large block of solid colour in the center section, and since most of the motif photos showed a colour change I decided to do that. I couldn't find any two pinks in the selection I had that worked together well and so I used a mid-range pink and white.
 When I first looked at this I thought it was too bold or something. But strangely, as I've been stitching the motifs around it, it is looking more like it belongs. There are only two other whole carnations on the coif, so I think it will be fine. But I'm stitching a few other things around it, including some leaves, just to be sure.
 The Mystery flower also needed to be stitched. I've done this one several times, so it was easy.
 The pomegranate is not complete, but the rest of the filling and the bits at the top will be gold, so this is it so far.
  Finally, the carnation. This was another problem. When the silks came, the new dye lot of the pink was totally different than what I had practiced with, but I thought I'd just work with it, since there was no way of knowing if I could get the old dye lot. I was also unhappy with the large block of solid colour in the center section, and since most of the motif photos showed a colour change I decided to do that. I couldn't find any two pinks in the selection I had that worked together well and so I used a mid-range pink and white.
  When I first looked at this I thought it was too bold or something. But strangely, as I've been stitching the motifs around it, it is looking more like it belongs. There are only two other whole carnations on the coif, so I think it will be fine. But I'm stitching a few other things around it, including some leaves, just to be sure.
Speaking of stitching, do you want a chance to work on the coif? I'm going to be in Williamsburg, VA for A Gathering of Embroiderers from the evening of Feb. 2 to Feb. 5. I'll have the coif there if you are going to be there for classes or if you live nearby and want to stitch. There are lots of leaves and buds that won't take too long if you want to sit and stitch for a while.
Sunday, October 17, 2010
I can't believe how fast the summer went - and the fall!
Now that the DDs are old enough to be home alone during the day, I spent much of the summer working. But I also had family trips to Canada and West Virginia to fit in. And a wonderful visit with some old friends. Needless to say, that left little time for stitching. But, I did end up doing a piece that will be coming up in an issue of NeedleArts as a companion project to an article on our chapter coif project and an article on the embroidery in the Agecroft Hall collection. This is the mystery flower (shown back in March when I was testing colours). I still don't know what the flower is, but here it is stitched up using Gylt Silk Twist. Lots of fun.
 The coif has been with a couple of other chapter members since June, but I will get it back this week to work up the motifs that have no instructions yet. That will be a fun project.
I've also just received confirmation that I will be in two fun classes at The Gathering of Embroiderers in February. I will be taking the two classes given by Tricia Wilson Nguyen - the lion and the floral lattice - the top two classes on this page. Just in time for working on the goldwork in the coif!
Friday, July 02, 2010
Notebook cover challenge
Just because The Mermaid in Her Grotto is done, doesn't mean I've stopped stitching. Next up was my EGA chapter president's challenge. We had a small hard covered notebook to cover for this challenge. I love little notebooks and have lots around so I wanted to do something a bit different with mine. After thinking of all sorts of uses and themes, I decided on a sort of photo album. I say sort of because I ended up doing an altered book technique on the inside. I glued all the pages together around the edges and then cut a recess in the center of the stack, and glued around that. I was going to stitch some sort of 3-D thing to put inside but realized that the book and the depth was rather small and I would just get frustrated. So I ended up using vacation photos to create a scene of our latest trip to Costa Rica. For the outside I used many of the leftover threads from the Mermaid to create a stumpwork cover.
The back is a mountain waterfall, not to much depth since it is the back. The rocks are made of the boucle threads I made for the grotto rocks.
 The front is real stumpwork. A couple of the leaves are wired and the toucan (with the badly shaped bill) is a slip. I used the real pieces of peacock feathers from my Mermaid kit for the body of the toucan - it seemed appropriate. The short palm tree in the lower left has fronds made of the purl purl with a silk core that is then pulled and twisted with another colour. The wire allowed me to bend back and forth and then fold to create a fringed frond. The bush in the lower right is made with GST threads.
 All in all, lots of fun.
The photo below is a collection of what was in my purse!!! As I prepared to go away at the end of May I decided to clean out my purse to be sure I only carried what was needed. My husband was amazed at all that came out of my purse and decided to lay it all out for a photo. As it was, I didn't weed enough, or maybe soon enough, because the strap on my purse broke while I was away. And it wasn't really a purse, it was a small bag from Ariat normally used for horse grooming tools. So I guess that means I'm hard on purses and my shoulder.


Monday, May 10, 2010
The Mermaid Is In Her Grotto
I had a lovely Mother's Day weekend, getting to do just what I wanted, so now I have my finished needlework to show you.
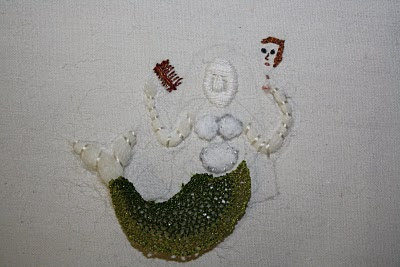
Here is the mermaid, with garnets in her hair and a rather fancy mirror.
 Here she is in her grotto, but not quite done.

And here she is in the grotto with fish, shells and semi-precious stone chips. I am especially please with the freshwater pearl in the shell - that is a real shell from a family vacation that actually stayed joined.
 I am very happy with how it has all turned out. And it was so much fun. For the final bits I was able to consult my own copy (as opposed to the university library copy which I have returned) of "English Embroidery in the Metropolitan Museum, 1580-1700:'Twixt Art and Nature". My DH got it for me for Mother's Day and found it online at list price still in the shrink wrap!! If, like me, you missed getting this book and now can only find it for over $100, you will appreciate the find. I was able to look through the pieces in the book that had water to decide what I wanted to do with the purl since the instructions gave a couple of suggestions for variations.
Here is the mermaid, with garnets in her hair and a rather fancy mirror.
 Here she is in her grotto, but not quite done.
And here she is in the grotto with fish, shells and semi-precious stone chips. I am especially please with the freshwater pearl in the shell - that is a real shell from a family vacation that actually stayed joined.
 I am very happy with how it has all turned out. And it was so much fun. For the final bits I was able to consult my own copy (as opposed to the university library copy which I have returned) of "English Embroidery in the Metropolitan Museum, 1580-1700:'Twixt Art and Nature". My DH got it for me for Mother's Day and found it online at list price still in the shrink wrap!! If, like me, you missed getting this book and now can only find it for over $100, you will appreciate the find. I was able to look through the pieces in the book that had water to decide what I wanted to do with the purl since the instructions gave a couple of suggestions for variations.
 Now I have all the amazing leftover threads to hoard. I've always had a problem using my best threads for small or experimental things, and these threads need something really wonderful. So I have some thinking to do. In the meantime, I have a coif to work on and the president's challenge for my EGA chapter to start (and finish by our June meeting!).
Tuesday, May 04, 2010
A Little Bit of Tail
I'm alternating my time between the coif and the mermaid, doing a 2 week each rotation so there is some consistency in my work. I've already let the family know that I want to stitch the whole of Mother's Day weekend except for a trip to the art museum to see the new wing and have lunch in the new restaurant there. If you want to see the latest on the coif, hop on over to the Gentle Pursuits blog.
That was before the meeting, this mermaid work is from the past weekend. I finished the fins for the end of the tail a while back. There is a gilt strip worked into the buttonhole lace that is really nice. The skirt is done with a new thread - a silver silk twist similar to the gilt silk twist from the Plimoth jacket project. The silver is a little harder to work with than the gold. I think the twist is a bit tighter so it doesn't flex the same way. According to Tricia's remarks in class, this was just a trial run and it should be fine once they get it to the point where they are producing enough quantities to sell. The kit included some peacock feathers to put around the edge of the skirt, but Tricia encouraged us to be creative with our mermaids, so I did something different. I'm fond of pearls so I used some tiny white beads to edge the skirt to keep things in scale. I have some small, cultured fresh-water pearls and some mother-of-pearl beads as well, but they were too big for the edging - I'm thinking of putting one or the other in the mermaid's hair.
 Next I went to the fish since the head and tail were on the same needlelace pad as the mermaid's tail pieces. The head and tail were stitched onto some felt and then I carefully sewed down the spangles to form scales. The sample had a mix of gold and silver covering the body but having studies zoology, I felt the need to be a bit more realistic. So I carefully covered the body in rows of gold, and then used the silver for some fins. The fish is just over 1 inch long.
Friday, March 26, 2010
Grotto rocks done - on to the mermaid
Things have been fairly quiet in the evenings lately, so I've been able to finish all the rocks in the mermaids grotto. Most are similar to the ones already done, bouche threads, silk gimp, French knots and purl purl variations. The one new rock is the front rock on the right side made up of lots of loops. The loops are small bits of silk wrapped purl - the silk wrapped wire that is then coiled. Tricia suggested it in class, and since I am in love with the purl, I just had to do it. I put one layer of felt under the loops just to bring it a bit forward, and it also helped because it gave something for the wire to hook into to keep the loops in place.
 Here is a close up so you can see the loops of purl.
 I still need to finish the bits of coral in satin stitch in the background, but in the meantime, I'm working on the mermaid. I have been questioning the body of the tail that I did in detached buttonhole lace using GST. As I did it, I didn't make the stitches very close or dense thinking it looked more like scales. But as I looked at it further, I realized that part of the reason it looked okay was because it was on the blue plastic that was the base for the needlelace pad. So, today I decided to remove the piece and see if I needed to do it again.
Here it is placed over the wool padding, and I really don't like it with the white background.
 But then I remembered Tricia mentioning in class that she wished she had used the flat gold thread that she put in the end of the tail into the whole tail, so I found some gold ribbon that I could cut to put behind the buttonhole lace, and now I am happy with the look. Now it looks more like gold and green scales. I was also worried that the piece was too small, but it turns out the size is fine. So on to the tail fins!

 But then I remembered Tricia mentioning in class that she wished she had used the flat gold thread that she put in the end of the tail into the whole tail, so I found some gold ribbon that I could cut to put behind the buttonhole lace, and now I am happy with the look. Now it looks more like gold and green scales. I was also worried that the piece was too small, but it turns out the size is fine. So on to the tail fins!
Subscribe to:
Posts (Atom)

