Friday, March 26, 2010

Grotto rocks done - on to the mermaid

Things have been fairly quiet in the evenings lately, so I've been able to finish all the rocks in the mermaids grotto. Most are similar to the ones already done, bouche threads, silk gimp, French knots and purl purl variations. The one new rock is the front rock on the right side made up of lots of loops. The loops are small bits of silk wrapped purl - the silk wrapped wire that is then coiled. Tricia suggested it in class, and since I am in love with the purl, I just had to do it. I put one layer of felt under the loops just to bring it a bit forward, and it also helped because it gave something for the wire to hook into to keep the loops in place.

Here is a close up so you can see the loops of purl.
I still need to finish the bits of coral in satin stitch in the background, but in the meantime, I'm working on the mermaid. I have been questioning the body of the tail that I did in detached buttonhole lace using GST. As I did it, I didn't make the stitches very close or dense thinking it looked more like scales. But as I looked at it further, I realized that part of the reason it looked okay was because it was on the blue plastic that was the base for the needlelace pad. So, today I decided to remove the piece and see if I needed to do it again.
Here it is placed over the wool padding, and I really don't like it with the white background.
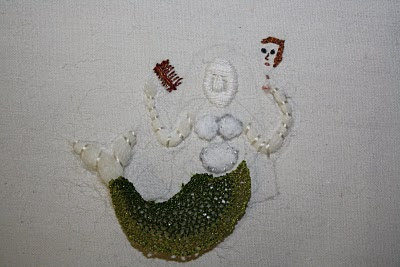
But then I remembered Tricia mentioning in class that she wished she had used the flat gold thread that she put in the end of the tail into the whole tail, so I found some gold ribbon that I could cut to put behind the buttonhole lace, and now I am happy with the look. Now it looks more like gold and green scales. I was also worried that the piece was too small, but it turns out the size is fine. So on to the tail fins!

Monday, March 22, 2010

Busy, busy, busy

I know it is hard to tell, but I have added two more stitched rocks to my grotto! During class, we did rocks all over the place depending on technique so we could try each one. As I'm finishing them off, I'm trying to start with the back and work forward so there is a natural sort of overlap. I did the blue and green bouche thread rock second from the left at the back. I had to make a couple of more mixes for that one, which helped to reinforce the twisting technique. Then I did the yellow/orange silk gimp rock in front of it. I actually did two layers because the one layer - like the blue and orange silk gimp rock at the back left - is very flat. I was please with the texture, although in hindsight, a layer of felt would have used less gimp - so I would have more for other things. The gimp was made by Tricia, specially for the kit, and it is really spectacular. But them I'm a sucker for silk of any sort.

Now to the coif. I'm still doing tests as some new colours of Soie Perlee have arrived, since there were a couple of places where I wasn't getting quite what I wanted. This daffodil is a case in point. I didn't like the gold and yellow contrast and the green was to bright when compared with my photos of the demi-lune purse at Agecroft that I took the daffodil from. So, I did some stitching tests to see what really when together because it was really hard to tell with the spools. Turns out it was a great idea, because two of the yellows look totally different than what I expected. When I have time (yes you can laugh here) I want to make up a whole sampler of the colours of Soie Perlee stitched up since that is really the only way to see how things will truly look. So, I'll show the final dafodill when it is done on the coif, you can see the start in the last photo. Here is the tudor rose - on the coif!!! Yes, I've finally started the stitching on the coif. Nobody wanted to take it home at last week's meeting - several people want to eventually, but they want to practice a bit more. I'm not completely happy with this because of the straight lines, so I'm going to play with things a bit so see how to fix it and add that to the instructions. It may be I need to work the petals from the inside out to the edges, rather than the tips in method I used. I just find it easier to get the outer edge looking nice if I start there, but the inside to the outer edge is actually the method used on some of the petals on the demi-lune purse - I had help when I looked over the photos.


So here is how it looks as of March 22, 2010. Stay tuned.


Wednesday, March 10, 2010

More coif practice

I've never had such a hard time trying to decide what to do. Mermaid grotto or coif motifs? For now, the coif is winning since I have to hand it on to the next person at our meeting next week.
Here is the mounted linen with the pattern drawn on it.


I've done some more tests before actually working on the real thing. This one was to figure out which direction was best for the detatched buttonhole. I know that when you look at historical photos there is a preferred direction to some motifs, but for the coif we are being relaxed and letting people stitch in whatever direction works best for them, as long as the whole motif is the same. When it is being worn and people see it moving, they probably won't be able to tell which direction the stitching is going.
This is a motif from the demi-lune purse at Agecroft Hall. We have no idea what flower it is (any suggestions?) The yellow cup will not be the shades you see. The petals will be like those on the right. I'm not sure which bud colouring is best. Maybe we will use both.


Sorry this is in sideways but I'm too lazy to do it again. This is the borage, unfinished so far, that I was using for a colour test. You can see the lighter colours to the left in small squares. Comments indicate that people like the dark blue best, so we'll go with it. Now I need to decide the best way to do the center.


Here is the honeysuckle.


And here is the pansy. The colours are quite striking and I like the gold leaf veins.


So now I need to make up a book to give everyone guidance on each flower and the colourways. We'll do the goldwork last.