Saturday, August 15, 2009

Stumpwork Tudor Rose box done

Once the rose and leaves were done, it was time for a butterfly - all the Elizabethan things seem to have a bug of some sort. I decided on a blue butterfly to be done in detached buttonhole lace. First I laid the wire, then I started the fill. I tried first with some filmy sort of thread from a kit I cannibalized, but it was horrible to work with as detached buttonhole, so I switched to silk. The bigger wings I did from the tip in, and the lower from the body out. I made sure there was enough separation between wings when I set out the wire so it would be easy to stitch, but later realized it might be a problem when I wanted to push them a bit closer. It actually turned out fine - though I'm sure there is a better way.
Here are the finished bits, ready to go on the box.
And here is my finished box. I'm rather pleased. Actually, it isn't really finished since I need to cover the wires with some material on the underside of the lid, but that will be easy (knock on wood - famous last words).

Thursday, August 06, 2009

Stumpwork sepals close up

I think I chose the wrong photo yesterday, so here is an in focus photo of the bullion picot edge on the sepals, and the long buttonhole I'm using to fill in the inner part of the sepals. You can see the material showing through in the center - I've since poked through it to put the flower together. Paula is mainly right, bullion picot and buttonhole, but the ends are buttonhole as well, since I wrap wire very poorly. Since I can't find bullion picot instructions online, I'll have to direct you to sharon b's bullion stitch instructions, but make it a very short distance between the in and out points on the stitch, and add lots of wraps. Mary Corbet has a video that might help as well. I've looked through my books and can't find the one where I learned how to do it, of course. Hope this helps.

Tuesday, August 04, 2009

Stumpwork Tudor Rose instructions - part 2

A quick hint on tools for wire bending. I started out with the red handled size - a cheap kit for beading from the craft store - and then moved up to real tools from Home Depot. They aren't great tools, they came in a box with lots of hand tools and most were bigger, but the whole set was only $12 (around Christmas) so it seemed like a good deal to me. The larger pliers are much easier to use, so treat yourself to decent tools.
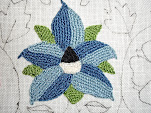
So yesterday, I had a lovely stretch of time after work and completed my Tudor Rose. For the sepals, I used green paper wrapped florists wire. In this case, because of the sharp tips, I bent the wire first.
Then I tacked down the wire and started doing a long button hole over the wire to form the sepals.
I had to stop in the middle of it all because two more baby geckos were born. We are up to 9 babies, 2 adults (in separate habitats) and one egg, due to hatch in a month. The female seems to be gravid again - we found out they can store sperm for a year so who knows how many more eggs will appear.
Back to the stitching. I used bullion picot along the tips of the sepals to simulate the jagged edge of the sepals.
The cutting out was easy and it was no trouble getting close. I am very happy with the neat edges formed by my non-woven material, whatever it actually is called. I'll have to carry a sample with me so I can check whenever I go to a fabric store. (or I'll have to change the brand of sanitary napkins we use in the house) While you do have to be careful not to create huge holes in the material, it did form the nice edge I expected.
And here is the completed rose on the box top. Not the final placement, just a test, since I plan on adding more decoration and the rose would get in the way. I just poked a hole through the material, padding and cardboard base, for those who wonder how it got there. I'll glue a piece of felt to the underside of the lid to hide the wires when it is done. DD the younger pointed out that it was off center, but I actually meant it to be, part of the design I have planned, so stay tuned.

Monday, August 03, 2009

Stumpwork Tudor Rose instructions - part 1

There was some interest in the Tudor-style rose I did earlier this year as a pin. So this past week I started a new one and I've documented the steps. It is also a bit experimental because I did it on an odd fabric. I have been hearing and reading about using dryer sheets for various stitching and craft projects so when some sanitary napkin samples came wrapped in some really neat non-woven material came in the mail, I saved the wraps. As I was starting the rose, I thought, What if you do stumpwork with a non-woven material so you don't have to worry so much about cutting the shape out? Well, here is where we find out.

It was very easy to trace the design onto the material. I put the wire down for all 5 petals with one piece of wire. I did this because I wanted 10 petals in total, but I didn't want 20 or even 10 wires for the stem to go in the posy holder. So I tried this. The one drawback is you can't overlap the petals very well, like you can in this single rose I did a while back. So here is the wire placement.

Then I buttonhole the wire down. I try not to make all my stitches the same length so it blends better later when I do the needle painting on the leaves

Then I use satin/long and short/whatever works to sort of needle paint the petals. I usually make at least a couple of passes because I like the depth it creates and I don't feel compulsive about filling in every space the first time - since that leads me to build up too much in one place and leave others blank. This way I take my time and fill in what needs.
This is the back of the piece because I wanted everyone to avoid an early mistake I made. If you carry your thread from one petal to the next, go down to the center and then up the next petal or you have threads crossing the area you will cut out. Obvious I know, but I did it the first time.
So here are the petals all completed. You might not notice in this photo since there is a white background, but, the material in the center is barely there. While I had no problems with the buttonhole and satin stitch in the petals, the large number of pokes in the center almost removed all the center material - which could be a problem depending on what you do.
So, I had to get creative with the center and put bullion stitches across the center hole and then put French knots around and through the bullion stitches. Once I have the second set of petals in behind, I may add the beads I used in my other roses.

Hopefully I'll be able to post the rest of the steps later this week or next. The DDs get their wisdom teeth removed next week so I'll have a day at home nursing but I suspect the TV will be a better nurse. I'll just make milk shakes now and then.