Monday, May 28, 2007

Stitching kit done

Despite having a few other things to do, I managed to finish the stitching kit I'm giving to the art club teacher who supported my VA tapestry idea. The last meeting is today after school and I'll post the finished tapestry tomorrow. For the top of the tin I decided on a real sampler of stitches so she would have a small reference library in hand. Being a part of TAST made this an easy project, although choosing what to do was a bit hard. The top row is cross stitch, the next a blackwork lozenge motif, both done with cotton floss, then Queen stitch, which is done with flower thread. The initials are cross stitch again, but this time in Vicki Clayton silk. The chevron stitch is done in linen thread (you may recognize this from my TAST work). Next Algerian eye done with Gumnuts Poppies wool/silk thread (really fun to work with). The up and down buttonhole variation is in floss again (this was from Elizabeth at Quieter Moments) and finally a row of flowers with herringbone leaves done in flower thread (remember TAST week 1) and French knot flowers in floss. The border is the crossed buttonhole from TAST last week.
Here is a side view show the ribbon I used to cover the tin. The lid has had dyed silk ribbon wrapped around 3 times. The bottom is some new Martha Stewart ribbon from Michael's. It is self adhesive and fit perfectly around the bottom of the tin. I used the same ribbon and a couple of the others in the pack to cover the bottom as well.
Inside is the biscornu and scissor fob, on a new pair of scissors. I put a magnetic bottom in the box, and included some gold plated needles and a needle threader. Below is the finished scissor fob since it wasn't completed in the last post.
I really had a great time doing this. I always wondered about people who specialized in 'smalls' but now I can really see the appeal. It was just so much fun deciding what to include and stitching up these things, and the change from stitching to finishing keeps the interest going. Mind you, I think I need to read up on how to finish tin tops. I sort of fudged it with some double-sided fusible interfacing and double-sided tape and I'm sure there must be a better way.

Saturday, May 26, 2007

TAST 21 Crossed Buttonhole Stitch

As mentioned in my last post, I decided to devote my stitching time to making a small sewing set for the art club teacher who didn't think I was crazy when I suggested the VA tapestry project to her. So while I don't have a neat little picture or interesting set of variations, I do have this week's TAST as a nice border on a biscornu and scissor fob. This is the finished biscornu (can't begin to list all the sites I have seen this at, as well as seeing a couple done by an EGA chapter member at a meeting, just Google the word and you'll get instructions).


This is the top of the scissor fob. Both of these will fit in an Altoid's tin, so I'm also going to stitch something for the lid. I'm not sure what yet, but it will have the same blue crossed buttonhole border.

I'm using 28 count Monaco cloth for this project and it is the first time I have used this type of cloth. It is quite nice for the over one work I am doing on these pieces. One of the members of my EGA chapter did some hardanger work with it and she thought it worked quite well for that. Having recently done a pilot class for a pulled work project I think it wouldn't be very good for that, a bit too stiff.

Thursday, May 24, 2007

Needle felting for fun!

Last fall we went to the Fall Fiber Festival of Virginia and saw some wonderful needle felted figures. My daughters and I fell in love and one of them decided she wanted a needlefelting kit, so we bought one. But no instructions! So I looked and looked for the perfect book to get us started and then one day at a friends place I saw what we needed: Fleece Dog: A Little Bit of Magic Created With Raw Wool and a Special Needle by Nobuko Nagakubo. I couldn't get to the quilting shop where my friend purchased it (good thing because I would have bought lots of fabric) but I did order it online. And this is what I've done

The dogs my daughters have made are adorable but they are waiting for glass eyes - I was to impatient! When they have eyes I'll post photos.

Aside from the expected needle pricks to the fingers this was a surprisingly easy and fun project. Not outrageously expensive either. Now I'm thinking of other things I could felt. Luckily there are great things to view on the Internet like Mandy's felt and Dy's felt box

Along the same lines there is silk paper at Calidore but I'm getting ahead of myself. This weekend I'm devoting myself to a small pincushion and scissor fob for the art club teacher who has been so wonderful to take on my crazy tapestry idea. She now wants to do more stitching and is going to work on a stitch book! I'm such a bad influence.

Sunday, May 20, 2007

TAST 20 Butterfly Chain

As I was thinking about what to do with this stitch I was also reading a book I received for Mother's Day, Medieval Gardens by Anne Jennings. It is a lovely book and one of the garden features it covers and gives instructions for is a turf bench. There was one picture in particular, which I can't find on the Internet to link to, that shows a woman reclining against a wall that seems to be set into a hillside. There is grass with flowers under her and extending out from the top of the wall as well. So I thought that closely packed butterfly chain would look like the wall, and then spaced butterfly chain would be the flowers on the lawn. I had no green linen for the lawn so I got out my trusty watercolours and made some green linen. Instead of plain butterfly, I tried a sort of weaving butterfly, hoping to get the effect of bricks, but as you can see below, it doesn't look at all like bricks. But it sort of looks like trellis work, so I changed my idea, but kept the green linen.
So I made really long foundation groups, with four threads to make trellising easy, and came up with this.
Then I decided to play around and this is what happened. Once again, if I was going to do this on something I'd plan a bit better so things weren't lopsided, but I really like playing around with weaving the threads under and over the foundation stitching.
Maybe I need to think about getting a loom!

Wednesday, May 16, 2007

New Blog - The Embroiderers' Story

Dorothy just posted to the EGA group about a wonderful new project to recreate an amazing embroidered jacket. The project is being done at Plimoth Plantation and they are going to keep us up-to-date with a blog http://www.plimoth.org/embroidery-blog/. It looks like it will be a very interesting project. Now there is something that will take a long time!

Inspiration and Creativity

I have so much to think about this week that my brain is racing faster than I can really think - and it's not just the tea and coffee I've been drinking all day. Rather, it is all the interesting and inspiring blogs I've been reading. Add to that the new things I've been reading up on for work, and well, you have one busy brain.


To start with, I've noticed that since I started my out-of-the-house part time job I've had alot more mental energy. I've had to read up on lots of new technology and start using it as well (Sharon B's Mindscape blog has been helpful for this). And I've had lots more face-to-face interactions as well, which has been nice. Despite lots of professional reading, I'm actually feeling more creative.


So then Sunday I see the most amazing piece of stumpwork imaginable. It is a large alphabet sampler by Donna at By the Bay Needleart. First she teases us with a few shots for Mother's Day. But after I wrote wanting to see more, she posted a photo of the whole piece. Donna has been working on it for a year and as well as the inspiration of seeing the beauty of her piece, I am inspired by the time she has taken. I mentioned it to a couple of members of my EGA group last night and they said they had pieces that have taken longer - in rotation with others. I have often slipped small pieces in with a larger piece, but my one big piece was not rotated with much of anything. I've been thinking of doing another big project but I felt I didn't have the time, but I realize now that maybe I just need to be willing to rotate and not set a deadline or deny myself different things while getting one thing done.


Elisabeth at Sew in Love had this problem a while back with her dog needlepainting and I voted for the finish is and get it over with plan, although she decided on the rotate it with other things plan. And now I'm thinking that maybe I was wrong.


Which leads me to one of the gapingvoid tips: Don't worry about finding inspiration. It comes eventually. If I worry too much about when to do something, I won't be ready for inspiration.


Sharon B, crediting Serena of Layers of meaning , pointed us to this wonderful list of tips from 2004 (before I was blogging). I like Sharon's choices, but I also enjoyed reading Sarah E's list because I too have times when I want to ignore everybody.


I think, given my own experience, my favourite one is: You are responsible for your own experience. There have been times in my life where I just did what had to be done because it seemed so overwhelming to take care of everyday life. I started to make time for needlework and then my husband gave me a classical guitar which brough music back into my life and it was funny how I was able to do those things and still take care of everything else. I can't say the cleaning suffered because I was never really cleaning all that much, so I'm not sure where the time came from. And of course now I feel better as well.


Just to give you an idea of where the inspiration and creativity can all lead, here is my crazy idea for this year (last year it was having every child at the elementary school plant a plant for Earth Day - it worked, but was exhausting). This is a map commemorating Jamestown's 400th anniversary. It was inspired by Catherine Jordan's Jamestown map and the EGA National Tapestry I saw at the National Seminar in October . The version done by my daughter's art club has a painted map with embroidered motifs designed by the kids (done on muslin and then stitched onto the map) and satin stitch lettering. Very little work has been done by the adults (the art teacher, my EGA chapter president Wendy who has been helping, and me).

Wednesday, May 09, 2007

TAST 19 Basque Stitch

I've been waiting for just the right stitch to do an underwater scene. The Basque stitch reminded me of seaweed and polyp corals. We have two in our tank, so I have put them here; green button coral and yellow polyps. We have live rock in our tank too. The Hawaiian rock has lots of red algae and the Tonga rock is pale with green and brown algae on it. We don't have a clown fish yet - we will need to get a tank raised one because we don't have anemones. The background fabric is marbled in blues and greys - I thought it would be interesting for this project. Would you believe I found it at Hancock Fabrics?

Saturday, May 05, 2007

TAST 18 Woven or Whipped Wheel and finished knot garden cross stitch

For this week's TAST I combined weaving and whipping to make a knot garden - literally since I added a knot when I went around threads. I first did the black for paths, going under all the light brown base threads and knotting on the vertical and horizontal threads. Then I started with the green, making knots in a square for the boxwood edging in each quarter and weaving in between to give the idea of leaves for the roses. Then I went around with each pink making knots for the flowers. I am happy with this one except for my choice of path colour - I should have made it a dark brown. The green and pinks are DMC linen thread which I just purchased Thursday and had to try out. As you can see, I've gotten over the idea of saving threads for some important project! I really love the texture of the linen. I used 4 stands of the green and six of the pinks.

I was inspired first by the radially symmetrical pattern of the wheel, and I thought there was potential for multiple rows creating an interesting pattern. Then, as I finished off the knot garden from the Museum of Garden History below I thought a knot garden would be perfect. I did make an attempt at a more complex design but it was not to be, so I stuck with an easier plan.

Saturday, April 28, 2007

TAST 17 Running Stitch

For some reason I had a different idea about what to do with the running stitch this week. I like all the patterns and ideas from Sharon B and Elizabeth at Quieter Moments, and we even had an darning pattern sampler class at one of my EGA chapter meetings. But I kept seeing something that was sort of like Assisi work in my head. I wondered if running stitch could be used for something more organic. So I drew a design from a Persian carpet book I am reading on some 18 count aida cloth and filled things in. 
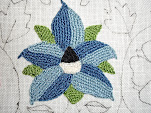
I like the effect although I would use linen so I could do more threads per inch to get more dense colour for the background. It would also be easier with a higher count to pull out the details of the design. And I think it would be better to actually plan the design on graph paper, especially since Susan at Crazy Quilt Susan has provided a link to make custom graph paper. I'm sure you can see it is more than a bit asymmetrical.

One of my other distractions

As well as work and vacation distractions over the past month, we also have the distraction of a new marine fish tank. This has been a great experience for the whole family. A new pet store had marine kits on sale and we have always wanted a marine tank - we gave away our freshwater fish tank when we moved in 2004. We decided we really wanted a reef tank because of all the beautiful corals so we picked up a couple of books when we purchased the tank. My older daughter has read the books through a couple of times now so she is the expert in the house.

The first thing we learned was that making space in one place requires moving many other things when your house is at capacity. The shelf we moved to make room for the tank stand had to go in the guest room/library and the desk from that room had to be moved to the art studio/garage for the sewing machine, and the shelf for backpacks that was displaced by the desk had to move to the other side of the doorway where it displaced a metal shelf which was moved to the attic where it displaced a small chest of drawers which luckily fit in the guest room/library that really did need a chest of drawers anyway. This all took several hours to accomplish since drawers and shelves had to be unloaded and loaded.

The next thing we learned is that marine aquariums require patience, lots and lots of patience. After conditioning the water we put live sand in the bottom of the aquarium which had to sit for a few days. Then we had to get live rocks (from Tonga and Hawaii) and let them site for a while - luckily this was while we were on vacation so it wasn't too bad. Otherwise we would have been watching this for a week.
Then finally we put in a few corals and a shrimp and hermit crabs and two snails and a fish. Later that week we added another fish and then later another coral. Now we have to let things balance again before adding a few more corals and one or two more fish. We also put a blue backing on the outside of the tank to highlight the colour.

As you can see there is now some colour and movement in the tank.

I'm very fond of this rock with yellow polyp and green button corals.
This is Zipper (I know it is blurry but it is really hard to get a photo). He is a six lined wrasse. We also have a Hippo Tang (blue fish like Dorey in Finding Nemo) and of course her name is Dorey.

They sun polyps aren't open much yet and the Kenya Tree leather coral is sort of floppy although the polyps all come out each day. We are now getting some algae build up on the glass and rocks but I understand from the books that this is all part of the mini-ecosystem we are trying to create. Luckily there is a very good marine aquarium shop nearby that has been most helpful in answering all our questions and recommending the easiest and heartiest fish and corals. It is fun to visit the shop with all the beautiful aquaria filled with colourful and amazing fish and invertebrates. There are a couple of giant tanks, one with a giant clam, that are truly spectacular and I can't even imagine how much they would cost to set up and keep. For now I am quite happy with our 29 gallon tank and the interesting creatures we have so far.

Tuesday, April 24, 2007

TAST 16 Palestrina knot

Another new stitch for me this week, which is always fun. I've cropped out my boring learning rows and just put out the good stuff. The purple lavender flowers are closely spaced knots in linen thread which makes a great texture. The lavender leaves are a version of Palestrina from my old favourite, Donna Kooler's Encyclopedia of Needlework, called Palestrina knot with legs. I used two strands of perle cotton that had the right shade of greyish green. The trees are the opposite, tops in Palestrina with legs and trunks in close knots, all with 6 strands of floss.

With so many of the stitches we are learning I find it amazing that thread and spacing can make a huge difference in how a stitch looks. And it is nice to experiment on something small - I've never been a doodle cloth person and now I see that you miss something when you don't play around with a stitch. Thanks Sharon!

Tuesday, April 17, 2007

TAST 15 Oyster stitch

I don't know why but the oyster stitch reminded me of a thumbprint and those books of making things out of thumbprints, so I went with the idea and came up with this. I used some alpaca wool I had from a previous project to make the sheep woolly.

Monday, April 16, 2007

Trip to England

Just came back from a wonderful 8 days in London, England. Sunny every day and in the 70s, so it was great for all the walking we did. I was able to tour through two gardens. The knot garden at the Museum of Garden History - which I was able to get as a kit for cross stitch and of course I started it on the plane - see above. I also toured the gardens at Kew, which didn't involve any embroidery but I love the gardens.
The other embroidery stop was the Victoria & Albert Museum. The textile area was closed on the day we went, but I found lots of textiles in other parts of the museum to drool over, including the Martha Edlin casket and some stumpwork mirror frames.
Of course we saw all sorts of castles and houses and museums and the Globe Theater and even went to a classical choral concert at St. Martin's in the Fields church. All in all an excellent trip.

Friday, April 06, 2007

Hoppy Spring


My EGA chapter did mailable stitched envelopes for this year's president's challenge. The envelope had to be designed for a special day. I sent off a spring flowers envelope for the first day of spring. This week I received a bunny decorated envelope for Easter. Merry Susan stitched these and then tucked a really nice scissor fob chart into the envelope. I love it!

Thursday, April 05, 2007

TAST 14 Bonnet Stitch

I had such fun doing this! I started with a couple of lines of the stitch to figure it out, but then realized that it looked very different depending on spacing and height and thread. As I thought about it, I realized that the closely spaced, short stitch looked like a rock path, and of course I thought gardens. I guess cleaning out the pond in the back yard made me thing pond - my pond is not that blue though. After the rounds of blue, brown and green, I did individual bonnet stitches for the flowers. I was going to just do French knots, but decided to try the bonnet stitch since I'm trying to only use the stitch of the week. It turns out they look a bit like tulips! Then of course, I realized that in orange the individual stitches could look like fish.

Friday, March 30, 2007

3-D Boquet DONE! (for now)

Since I had a few comments on doing the stumpwork petals for the first fritillary flower I thought I'd do the next set as a demonstration. The First on the left is the couched wire. You can see I used a plastic coated copper wire and only one wire sticks out - this is so I only have 6 wires for the stem when I'm done. This particular flower is based on a Jane Nicholas flower (unlike the others that I designed myself) and you can see a bit of wire sticking into the petal. This is because the real petals actually have a line like this that sticks out (see photo in previous post) The second petal has the wire covered in buttonhole. The third shows the start of the satin stitch layer in the lightest colour. You can see it goes under the wire that sticks into the petal. The fourth shows the finished satin stitch, with the tip of the wire under a few threads. The fifth petal shows the darning stitch used to get the checkered pattern. And the sixth is the finished petal. This time instead of detached buttonhole petals I tried doing the satin stitch on muslin technique like the petals, being very careful to make the backs completely covered.
And the completed stem, with two flowers and two leaves is below.


Then I put all my flowers together as a posy.


Now that I actually have spring flowers blooming (first tulip today) I don't feel the same urgency to design more - maybe next January. In the meantime, I have several WISPs I would like to work on, and a few other ideas in my head. The laidwork pattern I did for the TAST couching stitch looks like it would make an interesting brick pattern in a knot garden and I have been pouring over Embroidered Knot Gardens: Using Three-Dimensional Stumpwork, Canvas Work & Ribbonwork by Owen Davies and I'm thinking I might start planning!

Wednesday, March 28, 2007

TAST 13 Knotted Cretan

I was able to get a peek at TAST 13 during work yesterday and after mulling over the organic, textured aspects of the stitch, I had an idea to work on last night. I guess I had cherry blossoms on my mind. I did do some test rows on a separate piece of aida cloth (which is the only way I can come close to stitching a straight line), and it seemed to me that 2 strands of floss just didn't give much texture, so I used 6 strands for the trunk and leaves and three stands of the pink with 2 strands of Krenick filament added - although the sparkle is hard to see in the photo.

Although this little tree isn't perfect, it does make me realize that there can be impressionistic needlework as well. I was able to move my watercolour painting to a new level with a teacher who showed me how to be looser with my forms and colours, and I see that the same can hold true for needlework. I have been concentrating on realism with my 3-D flowers and I really love them that way, but I can see doing a piece with looser stitching and a more Monet like feel. It will be something to note in my journal and come back to when I'm ready to do another framed piece.

Saturday, March 24, 2007

TAST 12 Couching - Kicking it up a notch.

I haven't had time to surf the TAST web ring for a while so before starting to stitch on Thursday, with my trusty cup of coffee at hand, I began my journey and the blog right after mine on the list was so great! Here is one of the posts from Amy of In The Fold showing her fabric postcards with the TAST stitching. But be sure to look at all her work. Then I was guided to an absolutely fantastic up and down buttonhole Stonehenge by Pat. They are doing such creative and beautiful things it really made me reconsider what I have been doing with my TAST samples. I know that 'If you compare yourself with others you may become vain and bitter' but in this case I was inspired to try harder to make my own work more challenging.

I decided originally to use the challenge to create a stitch book of my own, and quickly realized that it was also a good way to try new threads and fabrics and colour combinations. But as I look through my samples I realize that the ones I like best and enjoyed stitching the most were the ones that were more than just rows of stitches. So, unless I really need to do some practice rows, I'm going to stitch something other than rows. I also tried to use only the stitch of the week in my work, and I'll try to stick to that unless I find myself blocked by it.

So this week I have two couching designs. The first is gold Krenick braid in a laid work pattern based on a chimney at Hampton Court Palace. I sketched the design in my visual journal (thanks Sharon B) and then was able to use a ruler to find the common lines to lay the long threads. I'm quite happy with this one and will use the pattern in other things.

The sunset interpretation is made with Bayeux stitch, which I learned about from a post by Carol-Ann at Threads Across the Web. I have been watching her progress on a Japanese embroidery with great interest and her stitching is exquisite.

For those awaiting spring, it is spreading north. I have snowdrops, squill, hyacinths and daffodils, but the crocus have finished. And my Lenten rose now has THREE flowers. I realize there are some of you over in GB who will laugh at such a thing, but it is a big deal for me.

Saturday, March 17, 2007

TAST 11 Up and down buttonhole

I didn't get a chance to think of this week's TAST until yesterday and lucky for me Sharon posted about Elizabeth's 3 pronged up and down stitch. As I looked through Elizabeth's variations, I was taken with one that looked like a flower (what else) at the end of the next entry. Actually, all of her variations are wonderful. I am in awe of so much talent - be sure to check out Elizabeth's Quieter Moments blog.


So last night, I made sure I could actually do the up and down buttonhole with a row, then I tried the pattern, all with my favourite floss of the moment, DMC Colour variations. I love this pink/orange variation. I started on 25 count Dublin linen, a very early purchase which I've decided was a mistake, but I see some potential for pulled work with it. Then used a 35 count Belfast linen with the same count in the pattern and I think I like the design even better in the smaller form.

The big excitement this week was finally have the girls' hair cut for Locks of Love. It wasn't as traumatic as expected for them, but now they both look older so it is traumatic for me. But I'm proud of both of them.


Thanks to everyone who has posted comments recently. It is great to get feedback on the things I am doing and I value everyone's opinion.

Friday, March 09, 2007

TAST 10 Barred chain and Stumpwork Fritillary

This week I decided to try something completely different and so, inspired by Sharon B's embroidery samples I made a colourful pattern out of barred chain. It was great fun and helped me learn alot about colour combinations. I also wish I'd used more textures as well, since I was only using the one type of stitch. But all in all I'm happy with it.

Below is my first fritillary flower. I tried wrapping the wires to form the stem but I didn't like the way it looked so I went back to the floral tape. I find I can get the wires together much tighter this way, which makes a big difference when trying to bend wires to adjust the way the petals fall. I still need to do another flower and two leaves to finish the full stem. I think I'll make the petals slightly wider on the next flower because they don't' quite overlap the way they do in the picture I posted. And since none of my fritillaries are in bloom right now in the garden, I can't check a real flower.