It was very easy to trace the design onto the material. I put the wire down for all 5 petals with one piece of wire. I did this because I wanted 10 petals in total, but I didn't want 20 or even 10 wires for the stem to go in the posy holder. So I tried this. The one drawback is you can't overlap the petals very well, like you can in this single rose I did a while back. So here is the wire placement.
 Then I buttonhole the wire down. I try not to make all my stitches the same length so it blends better later when I do the needle painting on the leaves
 Then I use satin/long and short/whatever works to sort of needle paint the petals. I usually make at least a couple of passes because I like the depth it creates and I don't feel compulsive about filling in every space the first time - since that leads me to build up too much in one place and leave others blank. This way I take my time and fill in what needs.
 This is the back of the piece because I wanted everyone to avoid an early mistake I made. If you carry your thread from one petal to the next, go down to the center and then up the next petal or you have threads crossing the area you will cut out. Obvious I know, but I did it the first time.
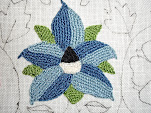
 So here are the petals all completed. You might not notice in this photo since there is a white background, but, the material in the center is barely there. While I had no problems with the buttonhole and satin stitch in the petals, the large number of pokes in the center almost removed all the center material - which could be a problem depending on what you do.
 So, I had to get creative with the center and put bullion stitches across the center hole and then put French knots around and through the bullion stitches. Once I have the second set of petals in behind, I may add the beads I used in my other roses.
Hopefully I'll be able to post the rest of the steps later this week or next. The DDs get their wisdom teeth removed next week so I'll have a day at home nursing but I suspect the TV will be a better nurse. I'll just make milk shakes now and then.


3 comments:
Hi :-)
I will be following this with great interest ......
I've only ever done the roses as
1)lay a thread cordonette (continuous, as you did in this post)
2) fill in with detached buttonhole
3) buttonhole the edges, incorporating wire as I go, and adding that final layer of buttonhole also neatens the edges a bit
It wouldn't make any difference whether you added the wire first or last; except the thickness of the cordonette/edge. I use 3 DMC strands for my cordonette.
One thing - it's always a total total bugger getting the wire to behave right at the beginning, and a little nifty work, possibly incorporating tweezers, is needed to get nice inner turns - do you think laying wire first makes those issues easier? Do you think laying wire first makes for a neater final edge?
You are brave re trying the non-woven material - I can just imagine me ripping it, or ending up with too many holes in the middle of a petal, or some such crisis. It'll be interesting to see how it turns out :-) :-)
Great fix-it job with the centre.
I was thinking of detached buttonhole lace but decided I wasn't quite ready to do the shading with that technique. I used some of the Gilt Sylke Twist, from Thistle Threads and the Jacket Project, to do some detached buttonhole and the gold make it easy to form the way I wanted without wire, which was fun.
I'm so used to laying wire first, since that was how I was taught in a Marsha Papay-Gomola clas, I think I would do the detached buttonhole the same way. I love your dusty rose in needlelace BTW. I'm studying it carefully in the photos for my next rose.
I use actual tools, like fine tipped pliers, for bending wire. I started with a tiny kit from the beading aisle of the craft store and found they didn't really fit my hands, so now I have real tools from Home Depot. I'm sure the guys in the tool section would have been horrified had they know!
I'm going to put these roses on top of little satin boxes with vines and such for my Pay it Forward gifts, so stay tuned!
well, you can't really shade with detached buttonhole. Just change threads at the end of a line.
I'd love a variety of pliers for wirework - I have my goldwork tweezers - but they work pretty well.
Thankyou for the compliment. I imagine you are going to do a similar thing - more layers of petals? Whatever - I'll be reading with avidity.
I was just recommending fishing tackle boxes to someone instead of embroidery floss boxes (the same thing, much cheaper). I'm sure their sellers wouldn't have been impressed either!
I'm going to try laying wire first next rose- might save a step.
Post a Comment